I have a lot of blogging stuff to do today. I’ve been concentrating on a lot of stuff, you know… (laughs)
Apple products that I cannot take my eyes off more and more, such as the announcement of iOS5, iCloud, and Lion which was performed in the early morning today. I cannot help looking forward to introduction, but because iCloud is still ahead of release, I have no choice but to use iTunes in the center of PC as before for the time being.
Now, the very important work that I had not done yet after purchasing iMac is this migration of iTunes. Windows which is troublesome in various ways, to be honest, I was worried whether I could restore the library by migrating data smoothly.
It is this work that I had a hard time every time I bought a new Windows PC, but when I was investigating various things in the net, I found an article like this.
The purchase was very smooth as it was Paypal enabled.
The detailed method is still the most detailed and polite blog above, so I’ll just explain the outline of the work.
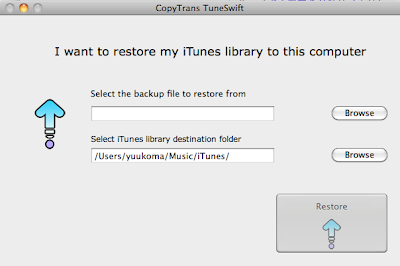
First, work on the Windows side. Install this software and launch CopyTrans TuneSwift.
After selecting Transfer, choose Mac as the destination. Please refer to the above blog for the file reference.
Then a file called “iTunesBackup.tsw” will be created in the folder you specified. Well, I don’t remember how long it took. Or rather, I fell asleep after starting the work ^^^.
Here, I didn’t write in the blog above, but in my case, as you can see, in addition to the file “iTunesBackup.tsw”, 10 additional files were created that were sequentially numbered “iTunesBackup.tsw2, iTunesBackup.tsw3,,”.
By the way, library data of my iTunes is about 30GB. I do not know the relation between data capacity and the number of this sequential number, but anyway, after a series of making of this iTunesBackup.tsw is finished, I copy all these to Mac.
At this time I used the USB memory of 16GB after all and copied it to Mac side repeatedly. Initially I tried to copy via online storage, but because it seemed to take more time than I thought, I gave up and chose a primitive method.
Now, when this copy is finished, it is time to work on the Mac side. This is also written in the example blog for details. All you have to do is to specify the file reference and press Restore button.
I think this process took a few ten minutes.
After that, I started iTunes on my Mac as usual, and it really restored my library as I always used it on Windows. But I think that PC authentication is not good. This is always asked when you connect your iPhone for the first time.