RAW現像ソフトとして結構長く活用しているAdobe Photoshop Lightroom 4ですが、Adobe Photoshop Lightroom 4から、gpxデータを読み込んで自動的にジオタグできるようになったんですよね。
写真のすべてを極める写真編集ソフト | Adobe Photoshop Lightroom 4 http://www.adobe.com/jp/products/photoshop-lightroom.html
The principle is very simple: by matching the “time information” recorded in gpx with the Exif information of the photo, latitude and longitude information is automatically written to the Exif.
To do this, of course, the time on the camera side and the GPS logger side must match.
I want to make use of it in this GW trip by all means, but I wanted to try it once while I was in Japan, so I did a little test.
At first, I started to get GPS log by using iPhone’s app properly.
And I’m going to bring this with me while I take pictures as I see fit.
Return to your home and load your photos into Adobe Photoshop Lightroom 4 (LR), followed by selecting Map View (from the menu above).
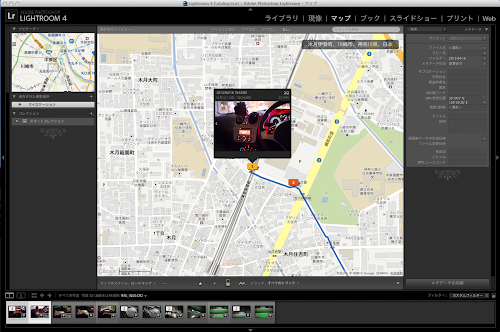
Select “Map > Tracklog > Load Tracklog…” and open the gpx file that you have just recorded.
If the route is displayed like this, it is OK.
Then, select the photo you want to geotag by Command (Ctr) + click, and click
If you select “Map > Tracklog > Auto-tag selected X photos,”
It will be automatically geotagged like this.
It’s certainly been done properly.
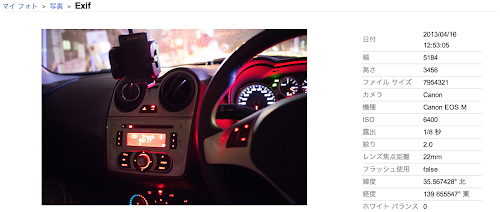
When you develop that RAW file into a JPEG, the latitude and longitude information is of course reflected as EXIF information.
However, recent digital cameras usually have built-in GPS, so you may not need to shave such a thing, but SLR cameras that you have been using for a long time are not equipped with it, so I think this kind of function is very useful.
I thought it was a little difficult to use, but I was able to complete the test without any problems, so I think I can use it smoothly for my travel photography.
Photoshop Lightroom 4 マスターブック for Mac & Windows
Masakatsu Nagayama
マイナビ 2012-06-27
Sales Ranking : 30542


